


Solving Automotive No-Start Problems
No Crank/No Start
With a no crank/no start condition, the first thing to check is the battery. The battery or battery problems are the number-one cause of this type of no-start condition. A quick way to check your battery is to turn your headlights on. If the headlights come on and are nice and bright, not dim or dull, then it’s likely your battery and its connections are okay.

The best way to test a battery is with a load tester. There are two types: a carbon pile and an inductance tester. They both do the same thing, but one is electronic and the other is analog. The carbon pile is the analog type tester. For this type, you hook the tester up to the battery and after you verify the voltage reading, you activate the carbon pile resistor to put a load on the battery. The surface charge of a good battery should be 12.6v or higher. When load testing with a carbon pile tester, you don’t want to see the voltage drop below 9.0v during the test. If it does, the battery is bad and should be replaced.

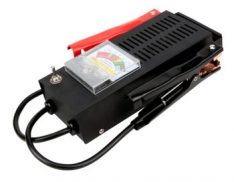 Load Tester
$30.95
Load Tester
$30.95
It’s also important to note that you’ll get the most accurate readings on a fully charged battery. If your battery is below 12.6v, charge the battery first, then do your load testing for best results. When you charge the battery, don’t go for the fast charge. Use the slowest setting possible. It’s best to bring a battery back to full charge slowly. Also, don’t recharge your battery with your alternator. This can actually damage your alternator by overworking it. Use a standalone charger on the lowest amp setting when charging a dead battery. I often perform the load test twice to remove what is called the surface charge from the battery, which often occurs after it’s been charged by the battery charger. This method helps eliminate false readings.
With an inductance tester, things are much easier. You hook it up to the battery, enter some basic information that can be found on the battery sticker (the CCA rating or cold cranking amp rating), and push the button. In a few seconds, you have a readout that tells you if the battery is bad or not. This type of tester uses a different means to test the battery electronically. It’s more accurate in its assessment of a battery’s condition and, admittedly, easier to use. You also don’t need to charge the battery before testing with a conductance tester because it uses special black magic to count the available electrons inside the battery instead of stressing it with a load. Both testers will work, but conductance testers are considerably more expensive.

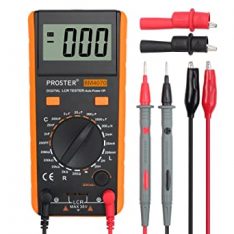 Inductance Tester
$33.85
Inductance Tester
$33.85
Once you’ve figured out whether the battery is good, it’s time to move on to the next step. For me, this is to check the battery connections themselves. You’d be surprised at how a dirty battery connection can affect electrical system performance. The corrosion buildup between the battery terminal and the battery cable can cause a no-start condition the same way a loose battery connection can. This is a simple, and often overlooked, cause of no crank/no start problems. So make sure your battery cables are clean and tight. You can use baking soda, an old tooth brush, and a little water to clean a battery. Try it; it works pretty good.
Here’s a video on checking battery cables that you might find helpful. It shows exactly what’s happening when you have a bad connection at the battery terminals.
Jumpstarting
If you have a weak or dead battery that’s causing the no-start condition, you can always jump the battery to try to get the engine started. This is traditionally done with a set of jumper cables hooked up from one vehicle to another. You can also use what’s called a jump box, which is a carry-around battery with jumper cables hooked up to it. These can be pretty handy if you need a jump and you’re parked in a position that’s difficult to rout jumper cables to.

Below is a video on how to properly jump a dead battery. Note that you hook up the positive cables first. Hook the positive up on the dead battery first, then hook up to the positive battery terminal or service post on the good vehicle. Some vehicles have the battery in a location that is not accessible from under the hood. With these vehicles, you’ll normally find a positive battery terminal somewhere under the hood, usually marked by a red cap with a + sign on it. Hook the negative cable up to the negative battery post on the good vehicle, then, when hooking to the dead vehicle, hook the ground to a metal part of the engine.

You do this for a couple of reasons. The first is that sometimes a dead battery can have a buildup of hydrogen gas around it. If you create a spark near this gas, it can cause it to ignite, which is not good. The other reason is that like in the cable test described below, you’re actually making a better connection for the starter. The cable connected to the negative battery post just bolts to the engine block anyway. If you hook your negative jumper directly to the engine block, you’re bypassing the cable and making a direct connection for the starter to use when you attempt to start the vehicle. It’s a much better way of hooking up jumper cables than hooking directly to battery negative on the dead vehicle.
If you’re able to get the engine started, great! A couple of things to note, however. The first is that you should not charge a dead battery with your vehicle’s charging system. This can actually overload the charging system and possibly damage your alternator. Once you’ve jumpstarted the engine, get to a place where you can remove and replace the battery if it’s bad or go to a place where you have access to a battery charger so you can charge the battery. I realize this might not always be possible, but do what you can to work toward this. It’s better than killing your alternator.
When charging a battery, the best policy is to do it over time, so select the lowest charge rating over the longest time to bring the battery back to life. Avoid quick-charging the battery, as this can weaken it. Also, as mentioned above, a bad battery can have explosive gas around it, so use the same caution when hooking up your charger. I recommend hooking up your cables before you plug in your battery charger. This way you can avoid any sparks that might be created when you start the charging process.
Check the Battery Cables and Connections
It’s worth mentioning that it’s a good idea to check the battery cables themselves. There are usually two main cables: one coming from battery positive down to the positive terminal on the starter, and one that goes from battery negative to the engine block. I know there are more cables that lead to the rest of the electrical system, but these are the two main cables that deal with starting the vehicle.

As with the battery connections, these cables need to be clean, tight, and intact. If you see damage or a lot of corrosion, this might be as far as you need to look. In fact, you can do a little trick if you suspect a bad cable. Take a set of jumper cables and bypass the suspected cable. If you suspect a faulty positive cable, you can just hook one end of the jumpers to battery positive and the other to the positive terminal on the starter. If the engine starts when you do this, you probably have a bad cable or connection somewhere. You can do the same with the negative cable, except you can hook it anywhere on the engine that’s metal that you can clamp to. If you know your cables are good, then it’s time to move on to the starter.
Checking the Starter
Starter manufacturers will not like the next part of this article, but backyard mechanics have been doing this for years. Sometimes you can get a starter that’s not working to work again by tapping on it with a blunt object, like a hammer. You don’t need to do this hard; just a few firm taps usually does the trick. This can get you by till you can repair or replace the starter.
I won’t get into starter design too much, but the reason this works is because over time the contacts inside the starter solenoid get pitted up and old and don’t make the connection they used to. When you tap on the starter housing, it relocates this connection to a point where it can make good contact again, and the starter works.
Other issues can cause the starter not to work, however. The first thing that comes to mind is that it never gets a signal to activate in the first place. Aside from the large cable coming from the battery, the other common connection to the starter is the solenoid feed wire. This wire sends a signal to the starter solenoid to activate the starter. This part of the circuit varies in design across makes, models, and manufacturers, but basically it’s the feed from your ignition switch that tells the starter to start.

Aside from the ignition switch, you might also have a neutral safety switch, or clutch switch, that is part of this circuit. A breakdown anywhere in this circuit can cause a no-start condition. Usually, the way I make the distinction between a starter problem and a solenoid feed wire problem is by what it does when you turn the key. If you hear a click when turning the key, nine times out of 10, you have a starter solenoid problem and the starter is the issue. If you don’t hear anything at all when you turn the key and you know you have a good battery, you might have a solenoid feed wire issue. To diagnose those, you need a schematic for the starter circuit for your vehicle. Here is a video covering starter testing that might shed some more light on this topic.
Here is a video covering the basics of what to look for if you have a no crank/no start condition.

10 thoughts on “Solving Automotive No-Start Problems”
Ashley
July 12, 2023 at 5:19 pm
Hi I need help with my Ford edge
Sergio Perez
October 11, 2021 at 11:13 am
Hello I have a 2009 dodge journey with 3.5 my question is how do u remove the crankshaft sensor when it breaks inside and there is no room to remove it and no videos in youtube . Thank u
mark lavrack
May 9, 2021 at 7:58 am
Hello: I have a 2008 Acura Tl with a j32a3. I recently viewed your video on the timing belt service on a similar vehicle you own. Please take out all those parts you just installed. I purchased my vehicle two years ago and knowing how important to do these timing change service I purchased a supposedly genuine kit on ebay. I took it to an ase mechanic and he installed it. Well after 20,000 miles something failed. The cams are not rotating while trying to start. Took off the front timing belt cover and too much slack. I like to work on my cars, but to nervous to do the timing belt service, knowing how important this is. I ruined my engine. Just wanted to warn you not to buy this junk china parts. Breaks my heart, just love this vehicle.
Peter
April 28, 2020 at 1:49 am
1998 Acura Integra automatic need help please!!!!!!
No start
Will start with brake cleaner and stay running
No injector pulse (no ground side)
No injector pulse while cranking
Has voltage on power side
Check injectors 11 ohms
Check fuel pressure 45psi
Refill with new gas,drain old gas
Car won’t start while cranking unless I spray some brake cleaner into intake. It will keep running when it starts. I check injector pulse, no ground side pulse from ecu. Injectors were all 11 ohms. Fuel pressure was 45psi. The rpm gauage works. What control the firing up of the injectors ? I am pretty lost rite now. Can someone show me some light? Please. Can it be a faulty ecu? Or bad maybe an bad crank sensor? Thanks appreciate it
brett weisensel
March 1, 2021 at 12:07 pm
I have the same issue on my prelude. Did you figure it out? If so, could you please let me know what you found. I have spark, pressure at the fuel rail, and no injector pulse…..
Alejandro Anaya
April 10, 2020 at 5:50 pm
I have a 2002 Honda Accord SE Automatic. I have a no crank no start issue. When I turn the key to the start position I just hear a singular click. Took the starter to get looked at and it’s in working order. Battery works as well. Suspecting a bad ground? Or bad battery cables? Or something? I have a video of the click sound please feel free to hit up my email @alejandroanaya33@yahoo.com
Malik
March 29, 2020 at 1:45 am
I have a 1966 mustang coupe 302. I drove it to a friends house then that next morning only turning over no start. I changed the coil and wires. Still nothing I also cleaned the rotor and the car started up for around 3 minutes or so then died again.. at this point I’m stumped on what to do. I also have electronic ignition no points or condenser so there’s that.
Malik
March 29, 2020 at 1:36 am
I have a 1966 mustang coupe 302 5.0 v8. My problem is that i drove to a friends house then the next morning i went to leave and I’m getting a no start issue. Replaced the wires and coil and i have found that i do get spark at the coil but besides that it just turns over. However i did clean the distributor rotor with some sandpaper and it started for like 3 minutes then died. I plan to get a new cap and rotor tomorrow but I’m stumped as of where to look now. I also have electronic ignition so it can’t be a points and condenser problem
Kameron Mathews
March 7, 2020 at 11:23 pm
So I have a 97 civic hatchback with a d16y7 and I replaced my timing belt and now it won’t start. No crank no start. Do you think it could be my distributor. The accessories still work like my radio and stuff.
Malik Cornist
March 29, 2020 at 1:36 am
Check timing?